A takes system in Blender
Override everything with simple python snippets
I have been using a system to generate arbitrary variations of a Blender scene based on simple python snippets. Although this is most useful for rendering different passes based on one scenefile, it can be applied to a lot more.
What is this for?
Imagine you are creating this shot of a car driving down a street and the camera is chasing the car. The render is split in several passes that are assembled in compositing:
- the car only
- the street and the car shadow
- the sky
- a fix for the windows of the car requested by compositing
- a license plate fix requested by the client
- the car beauty pass again, but different settings (for safety: faster render, but more noise)
- ...
During compositing, more and more passes are requested and the above list grows. By now, the mess in nuke is a beauty of its own. But the shot looks great, everyone is happy.
"It is perfect, done! Let's just do a slightly different camera angle." - The Director
This system allows me to do a change like that once, hit one button and automatically regenerate all related passes, ready for farm-submission.
Inspiration: Houdini and 3dsmax LPM
I have used two systems that are very enjoyable: Houdini's Takes system and the Light Pass Manager (LPM or Prism) for 3dsmax.
Houdini's Takes system is incredible. Any parameter can be overridden and all overrides can be instantly viewed in the viewport.
LPM also uses overrides, with the key difference, that you can not preview your pass in the viewport, you have to hit render and check what you have done in the framebuffer.
3dsmax pre-render script vs render_pre in Blender
LPM's way of working seems to be the easiest to replicate in Blender.
LPM collects all overrides in a script and runs it as a pre-render script: it is applied to the data that is sent to the renderer. The framebuffer shows you the result, when you come back from rendering, the scene has not changed.
Blender has something similar, called app handlers, which basically register a callback.
bpy.app.handlers.render_pre
This runs any code before the render starts, but it does it on the scene. When your render is finished, the scene has changed.
My workaround for that is to simply run the override in the background on a copy of the scenefile and save the result in a new file. This allows to alter the scene in any way, even be destructive. The only drawback is that it doesn't allow for quick previews.
Overrides as python snippets in Blender
Overrides are just python code, so anything that can be done with the python API can be used. Therefore, an override is not limited to rendering, it can be used to create any variation of the scene: various simulation settings, importing/linking assets, removing assets, exporting objects, run tests...
A basic override
(Note: I am using the words 'override' and 'take' interchangeably.)
An override is written as a python definition prefixed with 'take_' in a textblock within the scenefile.
Here is an example for a simple override definition that generates a renderable pass:
def take_carBeauty():
    takes.hide_all()  # start with an empty scene
    takes.world('carChaseWorld') #  set the world background

    takes.show(['car', 'driver', 'street', 'streetDivider']) # show collections by name
    takes.show(['lgt_env', 'lgt_headlights', 'lgt_streetlights']) # show collections by name
    takes.shadow_catch(['street', 'streetDivider']) # set collections as shadow catcher
    takes.mat_override(['street'], 'grey') # override collections with material

    takes.overscan(1.1) # overscan the camera
    takes.set_range(1001,1120) # set frame range
    takes.render_production # apply rendersettings
    takes.file_out('car_beauty')  # the file_out node in the compositor
Important note: overrides only operate on collections, not objects! More on that later.
Inheriting Overrides
Overrides can be inherited:
def take_carFX():
    take_carBeauty() # inherit take
    takes.show(['FX']) # show collections by name
    takes.set_matte(['car', 'driver', 'street', 'streetDivider'])
The override module
Above examples use 'takes' as the namespace to access ready-made methods.
This module is not imported into the scenefile. Running the override in the scene will fail, which is good: we don't want to apply any overrides in our workfile and mess something up.
The 'takes' module will be imported during pass generation on a temp copy of the file. More on that later.
Methods in the takes module can be generic or customized to a project, e.g. takes.render_production() might vary from show to show.
Collections!
Maybe the most important thing that makes this system useable, is the collections-system in Blender.
In an override, we dont want to work with object names: objects change, new ones are added, renamed or deleted.
Using collections to specify what is rendered, allows artists to just sort any object into a proper collection to use it in an override.
Ideally, overrides and collections are defined by TDs and asset departments during lookdev and are never changed by artists working on shots.
But what if I want to render a new pass with specific objects from an existing asset?
Using above example of the car chase: let's say compositing needs a pass with just the tires of the car. The related objects reside inside one big collection with the rest of the car.
How do we create a renderpass without specifying the objects in the override?
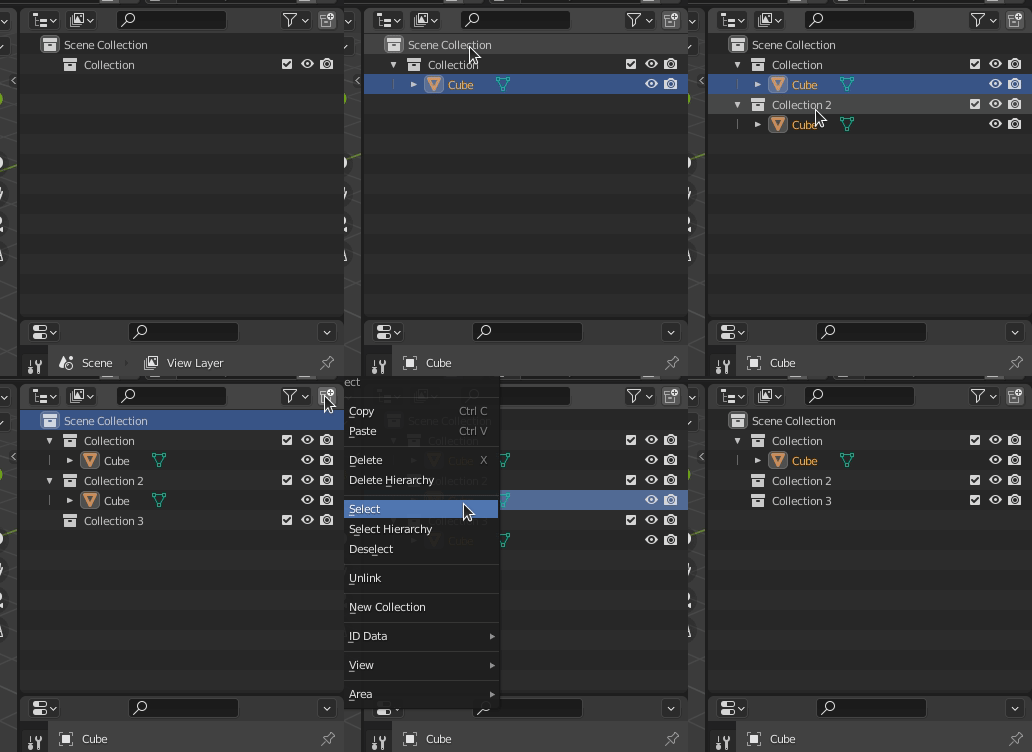
In Blender, objects are not stored inside a collection. They are stored in the file and then linked to collections. And they can be in more than one collection! Just CTRL+drag to another collection in the outliner:

If you want to remove an object from a collection, dont delete, but unlink.
Simple Interface
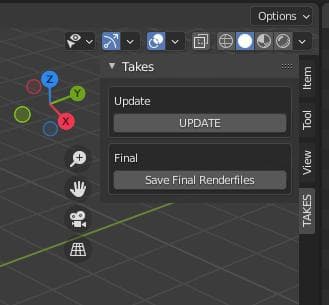
There are only two buttons: Update and Publish (or Save Final Renderfiles in the image).
Little code, little to maintain.

How to select takes to publish?
I like simple solutions and writing a UI in Blender usually isn't one, at least for me.
All I need is a list of takes that can be selected for publishing. There already is a perfect UI for that: the outliner.
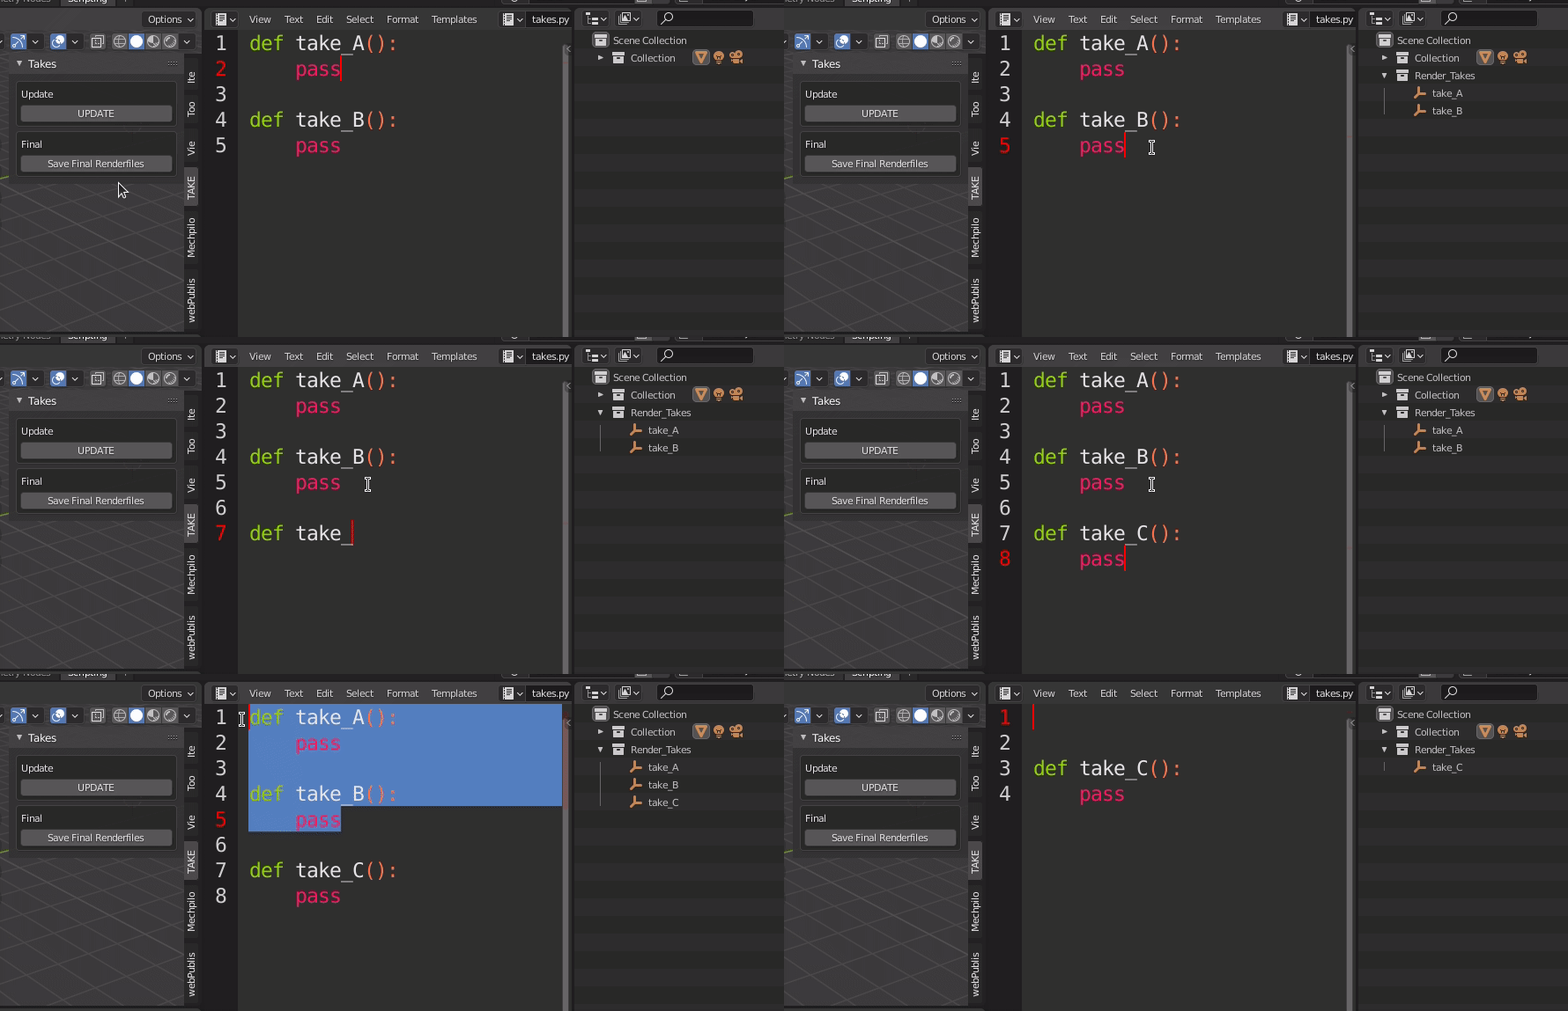
Clicking on Update will populate the outliner with an empty for each take. Now I can select the ones I want to Publish.
This code collects all definitions in a textblock prefixed with take_ and creates empties for them:
takes = bpy.data.texts[textblock_name].as_module()

def vdir(obj):
    return [x for x in dir(obj) if x.startswith(("take_"))]

a = vdir(takes)

# create empty per take
for obj in a:
    o = bpy.data.objects.new(obj, None)
    bpy.data.collections[collection_name].objects.link(o)

    o.empty_display_size = 0.1
    o.empty_display_type = 'PLAIN_AXES'
Creating and removing takes is reflected in the outliner. There is also some code checking if the Render Takes collection has been tampered with:

Process and produce the take
Publish will trigger a three-step process:
- Save a copy of the current file as a temp-file
- Generate a script that imports the takes module, runs the take definition and saves the file with a take-specific name
- start Blender in the background and run the script on the temp file:
blender -b tempfile --python runTake.py
Then it is only a matter of getting the files to a farm-submitter.
Final notes
I am using this system as the backbone of my 3D pipeline.
On publish, takes and all related assets are registered in a database which is read by submitters.
Some take-setups are also used across projects: creating deliverables during asset lookdev is standardised with a set of takes.
I like the takes-system because it not only makes my life easier, it also makes my co-workers downstream happy: it produces consistent output over versions and consistent output over a range of shots in a sequence.
Many more things can be done, here are some ideas:
- Overrides can be destructive: e.g. you can remove things you dont want in your file. Makes for lighter renderfiles
- You can mix render engines
- Sanity checks: implement tests to run on the scene
- Use for asset export/publishing: for example, a game assets can be exported in a take. The generated blendfile serves as an archive of the scenestate at which the asset was exported.
- Import heavy things: replace animation assets with render assets or import heavy simulation caches.
- Scene cleanup: delete collections not needed for rendering
- Create simulation with various settings
- Using a file_out node in compositing produces other benefits: set the standard file output to jpg with metadata burn-in enabled, to get a free jpeg sequence alongside your heavy exr files.
